Sunday, September 2, 2012

The Budget Beauty - Episode 14

My Favorite Bronzers/Illuminizors


I personally do not use bronzers on myself.  I have however, used them on a client during a photo shoot.  She was Caucasian.  She was the first Caucasian whose makeup I had ever done.  I now understand why bronzers are used. 

I had always heard that Bronzers give you that “sun kissed” look.  Looking in the mirror, I was already sun kissed and did not need it.  So, I never bothered to purchase any. 

One day while shopping in my local Wal-Mart, I happened upon Bronzers from a company called “Hard Candy” and decided to purchase 3 of them.  I had also heard about the Queen Collection Bronzers.  Wal-Mart was out of those.  I actually got them to use on my Ebony clients.  But they can be used on anyone.

To make a long story short, I used them on her and she look amazing!  The bronzer seemed to make her come alive.  That is the best way that I can described it. I am so happy I decided to get them.  Now to get the “Queen Collection” of bronzers what are recommended by Mr. Sam Fine himself!


1.  Hard Candy - Tropics


2.  Hard Candy - Tiki


3.  Hard Candy - Hula Hula


I do however like Illuminators!  I use Tiki as one and Giella, I Am Glam for the other.  I also use Estee Lauder's limited edition illuminator in Topaz Chameleon but not on my face.  Only in my décolleté area.

1.  Giella - I am Glam


2.  Estee Lauder Topaz Chemeleon


I have a few other products that I use but these are the major ones!


Friday, August 31, 2012

The Budget Beauty - Episode 13

My Favorite Blushes

The majority of my favorite blushes are from a company known as Milani.  However, I do own 1 high end blush.  It is the NARS blush in the color Orgasm.  I also own 1 of what I consider a mid range priced blush from the company “The Balm” and it’s the color “Hot Mama”!  I actually prefer Hot Mama over Orgasm.

The Milani blushes are Sunset Beach (discontinued), Luminous (discontinued), , Luminoso, Tarra Sole and Mai Tai (discontinued).  Mai Tai is said to be a dupe for MAC’s Bite of an Apple.  I have 2 blushes from Sally Hansen in Cherub and Poppy.  One Black Radiance blush in the color Warm Berry.  I also have 1 blush from NYX in the color Terra Cotta and one CoverGirl Cheekers blush in the color Golden Pink which is supposed to be a dupe for the MAC’s Razin.  


However, I do want to purchase 2 more Milani blushes.  They are in the colors Corallina and Bellissimo Bronze!

Thursday, August 23, 2012

The Budget Beauty - Episode 12

Beautiful Blushes That Were Given Away On My FaceBook Page!!  Closed

I purchased some wonderful, discontinued blushes from ebay.  I got Milani's blushes in "Mai Tai", "Sunset Beach" and "Luminois".  I also purchased a Sally Hansen blush in "Poppy"  I hosted a giveaway on my Facebook page for my friends and family.  I had 2 blushes in Luminous and Poppy to give away.  I also held a drawing for 1 Sunset Beach. 


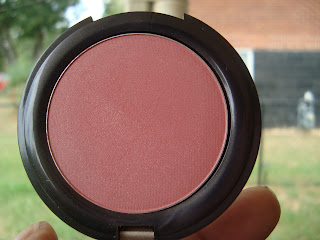
This first color is Sally Hansen's "Poppy".  It's a mid tone or gray based Mauve/Pink blush with some gold shimmer.  Complments all skin tones.


This next blush color is Milani's Luminous #08.  Billed as a dupe for Nars Orgasm, it's a Peachy-Pink blush with golden shimmer.  It leaves a beautiful golden glow on your cheeks!


The last blush color is Milani's Sunset Beach #07.  This blush is described as a "Mat Burnt-Peach".  This color is gorgeous on brown skin!


Saturday, June 9, 2012

The Budget Beauty - Episode 11

To Use or Not To Use, Eyeshadow Primers


I was asked how do I make my eyeshadow pop. My response was that I use an eyeshadow primer. Eyeshadow primers can do several things. First is that they can create a "blank" canvas so that you can see exactly what you are doing. Another thing is that they give your eyeshadow something to hold on to. This will make your shadow last longer. They stop your eyeshadow from creasing throughout the day and they can make your shadow color more vibrant or deepen it. It all depends on the color of the base for primer that you use.

In order to get the best color payoff from your shadows, always use a patting motion when applying your shadows to the eye lid area.  Never use a brushing or sweeping motion.  Save that for the blending.
Below is a short video on how to make your own primer as well as a picture demonstrating the differences.


From Top To Bottom
No Primer
Store Purchased Primer
Home Made Primer
White Cream Product (NYX - Milk)
Black Cream Product (NYX - Black Bean)


Thursday, May 31, 2012

The Budget Beauty Episode 2

The Canvas

First, like an artist getting ready to paint a masterpiece, we must first prep the canvas.  To do this, we must start with a fresh, clean face.  Follow your normal skin cleansing routine.  Now, let’s add a twist.  If you don’t already, be prepared to exfoliate your skin.  There are a lot of products on the market that will do this.  Here a natural alternative to store bought products.
Lemon Sugar Scrub
1 T Sugar
Juice of ½ lemon

Place the sugar in your hand or bowl.  Add enough lemon juice to form a paste.  Apply to face in upward circular motions.  Make sure to pay special attention to areas around the nose.  Be very careful and DO NOT get this in your eyes.  Let the product work for you.  You do not want to scrub so hard that you irritate your skin.  Rinse well with warm water.  Your skin should fell soft and smooth.  Now, apply your favorite moisturizer.

My favorite moisturizer is Neutrogena Oil-free Moisture for sensitive skin.

Sugar granules are slightly small and less abrasive to the skin.  Sugar is also a natural humectant which means it attracts moisture.  This is why sugar is used for this and not salt.
Lemons are also great for the skin and server as both a toner and astringent.  The fruit’s acids loosen the “glue” between dead skin cells, and the cells fall away, leaving your face very smooth and soft.  Lemons also have a bleaching effect.  Do not use the scrub and go into direct sunlight without protection.

The Lips

Exfoliating your lips not only helps the skin hold more moisture and prevent chapping, it also makes your lips silky smooth and kissable and helps your lipstick stay on better.  Here’s a great all natural scrub for your lips.

Honey Lemon Lip Scrub 
1T Sugar
Honey

Place the sugar in a container.  Add the honey 1 teaspoon at a time until you get a consistency you like.  If you like, you may add a couple drops of olive oil or lemon essential oil.  Get a small amount of scrub on your finger.  Put it on your lips and rub in a circular motion.  Once you have completed this process, rinse your lips with warm water; apply your favorite lip moisturizer, lip balm or just plain petroleum jelly. 

Store your product in an airtight container.

Tuesday, March 6, 2012

The Budget Beauty - Episode 10

Skin care for the MEN!!!

What Is the Skin Made of?

The skin is the largest organ in the body, comprising about 15% of the body weight.  The total skin surface of an adult ranges from 12 to 20 square feet. In terms of chemical composition, the skin is about 70% water, 25% protein and 2% lipids. The remainder includes trace minerals, nucleic acids, glycosoaminoglycans, proteoglycans and numerous other chemicals.

The skin consists of three main layers: epidermis, dermis and subcaneous tissue.

Although men traditionally spend less time caring for their skin than women do, they spend more time damaging their skin through outdoor activities and hazardous work conditions. This is why I want to offers tips on skin care products that are not necessarily only for men but for women also.  For this article, I will include a product line that is dermatologist recommeneded.   

I want to introduce you to CeraVe.  I purchased and have been using this product for about a month and I really like it.  They have a FB page and you can go to the web site and get a coupon.


Guys, it’s not too late to adopt a healthy skin routine.  CeraVe can help you.  I got mine at Walmart.

http://cerave.com/purchase-cerave/print-a-cerave-coupon/

Wednesday, February 8, 2012

The Budget Beauty - Episode 9

Quick Guide:  When to Keep or Toss Beauty Stuff

As much as I like makeup and enjoy trying new products, there is a reason I have to hold back.  If you look at the picture below (random pic off internet) there is a lot of makeup on the floor.  The person whose site I copied this pic from is about to sort through all of this to figure out what she should keep and what she should throw out.   


Now, if this was all to go to the trash, that is a lot of money wasted!    Please do not get caught up in the hype of buying just because someone else says it’s a great product.   But if buying products and testing them out is your thing, then by all mean make it do what it do!  We can’t deny the fact that we sometimes keep Make-Up even if they're past their expiry dates, but it’s a must that every make-up collector should know when to keep and when to toss Make-Up and other Beauty Products to avoid unwanted hypersensitivity reactions from expired stuff.

However, there are also brands do not follow the list posted above, like for example NARS blushes, their crème/powder blushes' lifespan is 24months. With these deviations, there are other signs to watch out for, for us to decide whether to Keep or Toss our precious babies.

When to discard your makeup

1.       Liquid Foundation                 6 – 8 Months
2.      Crème Base anything             1 year
3.      Powder Products                   2-3 years
4.      Liquid Eye Liner                    2-3 Months
5.      Mascara                                2-3 Months
6.      Lip Stick/Palette                    1 Year

 1. As a general rule, if a product doesn’t cause hypersensitivity reactions or allergic reactions to the person using it, it would mean the product is still safe for use and it is still safe to keep.

 2. Almost every beauty product in the market indicates that the product would be best used within 12 months after you open the package

3. If there is visible separation in the components of a liquid product, Toss.

4. If there are changes in the scent/odor of a product, Toss.

5. If there are visible changes in the color of a product, Toss.

6. If you think you’ve been keeping the product for God-knows-how-long and is doubtful if it’s still safe for testing, Throw it out.

Observing proper hygiene in using your beauty products doesn’t only decrease the chance of you getting allergic reactions from the product, it also extends the lifespan of these products as well, which is imperative for those who love purchasing expensive beauty products.

Here are a few tips to prolong the lifespan of your favorite beauty products.

For your pressed powder products, get a product called “Beauty So Clean” or put some 90% alcohol in a mist bottle.  Wipe off the top layer of your dry, powder product with a clean tissue; spray lightly with the alcohol; allow to dry then put away.

1. Avoid double-dipping!

2. Use clean/sanitized spatulas, wands, sponges. These items decrease the chance of us, introducing     microorganisms to the product.
 
3. Do not share makeup with anyone else.

4. Clean your make-up tools regularly, this includes brushes, sponges and whatever you use to apply the products with as these cosmetic tools can serve as the best breeding ground for germs.

5. Keep the product's lid tight all the time, to avoid the products from drying out fast.

6. Keep the products off moist, warm areas. Liquid items separate faster when exposed continuously to high temperatures. Keep your cosmetic storage away from windows or from direct sunlight. Moisture can also serve as a good breeding ground for microorganisms.

7. On eyeliner pencils, sharpen before usage, even just 1 twist will get rid of microorganisms that thrive in the tip of the pencil, remember that the eyes are the most sensitive part of our face, make sure your eye products are always clean.
 
8. On lipsticks, swipe the tip to a piece of tissue paper before swiping on your lips, when using a lip brush, clean the lip brush first before usage.
 
9. On compacts, to prolong the lifespan of these products, make sure to keep your sponge in a separate container or keep the thin acetate film that separates the sponge from the surface of the compact. Facial oil that the sponge collected during touch ups can harden the surface of the compact.


Monday, January 30, 2012

The Budget Beauty Episode 8

To Blush or Not To Blush


1.  First choose the color using nature as your guide. According to InStyle, the trick is to find a color that matches your cheeks when they're flushed after exercise or being out in the cold. For a quick test, "spank" your cheeks and use the resulting color as a guide. (We suggest doing this in the comfort of your home away from other people, wink). Another trick is to match your lip color. Fair skin looks great in rose, olive in peach & dark skin in apricot or even red.
2.  Now that you have the color, choose the right formula for your skin type. Powder is typically best for oily and combo skin. Cream is great for dry skin. Liquid and gel are great for oily skin. For even better results, combine cream and powder together. "It helps my blush stay on longer and looks more luminous," said makeup artist Laura Mercier in O Magazine. Keep in mind stains -- great for well-moisturized skin, not dry skin -- tend to dry very fast so blend well and fast.
3.  Apply foundation, eye color &and lipstick. While blush is usually your second-to-last makeup step (before powder), you should experiment with what works best for you. Some makeup artists like to apply blush BEFORE foundation for a more "natural" look.
4.  Throw out the freebie "Barbie-size" blush brush that comes with the blush. Use a full brush instead (Try E.L.F. brushes from Target), but don't use the same brush you use for your powder.


5.  Put the blush on your brush, tapping off any excess or put a dab of gel on your fingers.
6.  Look into the mirror and smile. This helps you figure out where the "apple" of your cheek is.
7.  Since you want a healthy flush, it's best to apply blush only to apples of your cheeks. Keep color light and blended. If you're using gel or cream, NYC makeup artist Carlo Geraci (in O Magazine) suggests dabbing it on with your middle finger, then blend with your ring and middle finger. The clean finger will pick up any excess blush.
8.  If you've gone a bit too heavy on the powder blush, a bit of translucent powder over it will calm it down. For cream blush, blot the color off with a tissue. Since gel and liquid blush "stain" the cheeks, the only way to lighten them is it wash your face, moisturize and reapply your makeup, this time more sparingly.
9.  Finish your look with a sweep of translucent powder.

Wednesday, January 4, 2012

The Budget Beauty Episode 7

Lashes – True or False


The purpose of eyelashes is to keep dust out of our eyes and to act as a 'trip wire' to protect our eyes.  My niece, LaKendria, has the longest, most beautiful lashes on the planet!  And she has some huge beautiful eyes to match!  I just want to slap her! LOL

My lashes are the direct opposite.  They are very short; almost nonexistent.  They have no curl, no density.  Now there are products out on the market that claim to grow your lashes.  I did a research on Eyelash Growth Serums.   The name Envyderm Eyelash Growth Serum was the first thing to pop up in Google.  I took time to check out the first four ingredients.  The first ingredient is “Water”.  We all know what that is.  Next was “Butylene Glycol”.  It is a common humectant and solubilizer used in cosmetic and food preparations.  After that is Hydroxyethyl cellulose which is a gelling and thickening agent and next is Panthenol which is the alcohol analog of pantothenic acid (vitamin B5), and is thus a provitamin of B5 .  In cosmetics, panthenol is a humectant, emollient and moisturizer.

I went to the website of the company that produces it just to see what the cost is.  People are paying $99.95 for this stuff.  Yes, $100.00 for 5ml/0.17 fl.oz. Don’t believe me?  Take a trip to the site and find out for yourself.  Here is the web address: 


Ok.  So now we have water; a humectant (something that attracts moisture).  One of the most common humectants is sugar.  Don’t believe me?  Put a hard cookie in a zip lock bag with a slice of bread.  In a day or so, you will have a moist, soft cookie and the bread will be dried out.  We need something to hold our ingredients in a gel state and a B vitamin. 

Reading over some of the ingredients of some products that I already have, I, Natasha Benton have deduced that all you need is Aquaphor and Vitamin E Capsules.  Now let’s see why.  Here are the Aquaphor Ingredients: 

Active ingredient:   Petrolatum (41%)  Inactive Ingredients:  Mineral Oil, Ceresin, Lanolin Alcohol, Panthenol, Glycerin (which is a humectant), Bisabolol. 
Now, the ingredients for Spring Valley Vitamin E (200 I.U.) Capsules:  Dl-Alpha Tocopheryl Acetate, Gelatin, Glycerin, Water.  Personally, I just like Vitamin E.  You really don’t need it!

I have been using Castor Oil on a Q-Tip for about 1 week now.  I have not noticed any growth but I have noticed less lash fallout and less lash line itchiness.  I am going to make my own “Lash Growth Serum” and if you want my recipe here goes!

Tasha’s Lash Growth Serum
½ T Aquaphor
½ T Castor Oil
1 Vitamin E Capsule

Mix all ingredients together and store in a container with a tight fighting lid.  Apply nightly with a Q-Tip to the base of the upper and lower lash line.  Do not get product into eyes.  May also be used on the brows.

For those of you who are willing, you can pay me $50 for a 5gm jar of “Tasha’s Eyelash Growth Serum”.  I will even throw in some Q-Tips from the dollar store.  Just kidding!

For My Facebook Friends and Family ONLY!!!

I will be hosting a give-a-way January 27, 2012.  This give-a-way is for my Facebook friends and family only!  All you have to do is be a follower on my blog.  That’s it!!  Here’s a sneak peak at one and yes I did say “one” of the prizes!

This is the Coastal Scents 26 Shadow Blush Combo Palette!  The 26 shadow blush palette comes in nearly nude, browns, taupes, peaches, pinks, rose, and rich plums. There are 21 shadows and 5 blushes in shimmer, pearl, and matte shades. Some of the shadows can be used as blushes with great results.

With awesome palette you can create beautiful neutral looks.  This is also great for newbies!


The Budget Beauty Episode 6

The Eyes have it!  Part 1

1.   Your eyebrows frame the face
2.   If you want a natural looking brow, do not use brow powder; use a very sharp eye brow pencil to draw in eyebrow hairs ONLY where there is no hair.  Do not use a lip pencil as they are too soft.
3.   Where should my eyebrows begin, arch and end?
4.   The further apart your brows are, the wider your nose will appear.
5.   Super thin, overly arched brows make you look older.  Opt for a fuller, softer brow with a subtle arch.  This will soften the face.
6.  Contrary to popular belief, you do not want your brow to look drawn on
7.  Stay away from the “tadpole” eyebrow.
8.     DO NOT use black brow pencils or powders to do anything to your brows.
9.     Do not over pluck your eyebrows.
10.   If your brows are well groomed, you will look great without makeup!